Lustrous curls look stunning on all hair lengths, colors and textures. If you’re unlucky to get them naturally, I will show you how to curl your hair like a pro. The wide range of curling devices that we have today only work to accentuate that curvature. While there’s a lot to learn about curling, with enough practice and mastery, you’ll create waves and curls like a superstar hairstylist.
1. What are the different curl types?
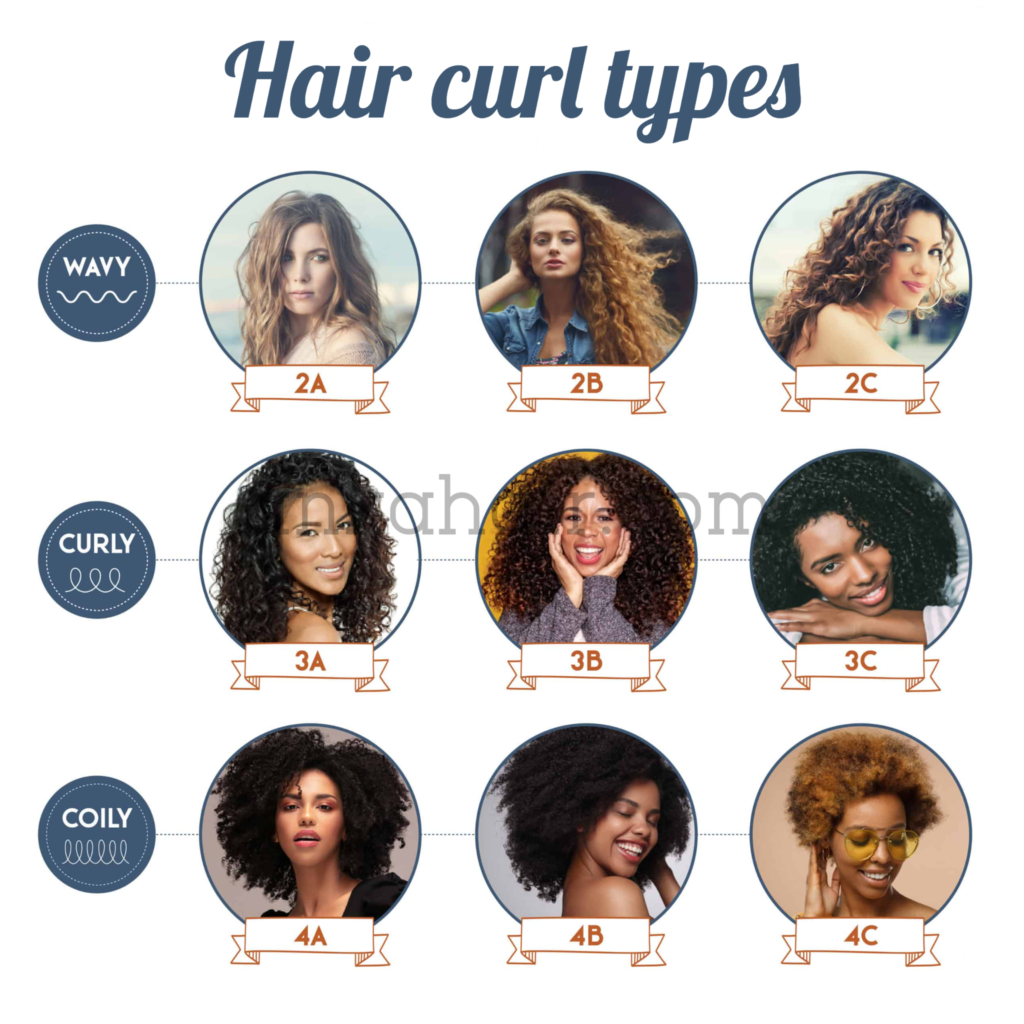
Before you start, there is one thing that you should know. Your curly style basically depends on the shape of the hair follicle from which your hair grows. The flatter or oval the hair follicle, the more curly the hair is. On the other hand, the rounder the cross section or hair follicle, the straighten your hair will be. Hair patterns are precisely divided into 3 types: wavy, curly and coily.
- Wavy hair: can range from perfect ocean waves to bouncy, bouncy, indeterminate curls. The easiest way to tell if you have wavy hair is to curl your hair into a small “s” shape when it falls over your shoulders.
- Curly hair: this is hair type 3, mainly characterized by loose curls, shiny curls and tight springy curls. Because this type of hair is very prone to frizz and damage, you will have to proceed with conditioning your hair by using lots of moisturizers and conditioners to maintain the soft spring look of your hair.
- Coily hair: is often referred to as type 4 or curly hair. It’s really dry, spongy and wrinkled. The curls are tied tightly in and around the head and are prone to severe shrinkage. People with frizzy and tangled hair love to moisturize and hydrate their hair.
You can see more curl style at here
2. How To Curl Your Hair With Heat?
2.1. With Curling Iron
Curlers can be used to create tight, formal curls, big and bold waves, thin spirals or thick tube curls. From large to small, you can have any curl you want depending on the curling iron. To curl your hair with a curling iron, try one of the following methods.
Method 1: Wand curling
This method divide into 10 easy steps
- Step 1: Heat up the curling iron. Turn on the curling iron and heat it to 320 degrees for thin hair and 430 degrees for thicker hair. Experiment to find the right temperature for you. It is best to use the lowest temperature to do the job. This will damage your hair less.
Test the temperature of the iron by pressing it against a piece of white tissue paper. If the paper burns, the curling iron is too hot.
- Step 2: Comb your hair thoroughly. Make sure there are no tangles or your curls won’t form properly. Your hair must be completely dry before perming. Blow dry any wet parts.
- Step 3: Apply heat protectant to hair. This product is usually sprayed on dry hair. Heat retardant will form a cushion between your padlock and iron to add shine and prevent damage at high temperatures.
- Step 4: Divide the hair into 4 sections. Divide your hair into top and bottom halves, then separate each of those sections into a left and a right section. From there, you can divide it into subsections about 2–3 inches (5.1–7.6 cm) wide. Secure the sections with clips so that the only hair hanging is curled or the next section of hair to be curled.
- Step 5: Work in sections, curling your hair. To achieve the curl of a wand, simply take the wand and wrap your hair around the barrel. Do not use the clip at the bottom of the wand to “hold” the hair when curling. Be sure not to overlap your hair, as this will reduce the heat and lead to softened sections. Use your fingers to hold the edge of the hair close to the barrel without burning the hair. Doing this instead of using clips will help prevent curls.
Make sure to alternate the clockwise and counterclockwise bending directions for a more natural effect.
- Step 6: Quickly pin curls for longer hold. Grasp the bottom of the curls, curl the curls to create the perfect curl. Use bobby pins or similar hairpins to tie a circle of hair onto your head.
Pinning the curls up will help them hold their shape as they cool. This will make the curls longer.
- Step 7: Continue until all your hair is pinned up. then wait until the curls are no longer hot before you remove the clip.
- Step 8: Remove all bobby pins once the hair has cooled. Shake the curls and fix any tangled curls.
- Step 9: Curling, if desired. Unless you want to leave it in its current, more formal form, mess it up with your fingers or tease it a bit. Messy big curls are a great way to create waves.
- Step 10: Lightly add hairspray to keep your curls in place. Do not spray too much, as this will make your hair brittle and/or weigh it down.
Method 2: Spiral curls
This method divides into 5 easy steps:
- Step 1: Take a strand of hair to curl. For tighter curls, take smaller sections of hair.
The ends of your hair are very fragile. If you start at the bottom of your hair, you may be more likely to damage your hair.
- Step 2: Squeeze the curler open and place it near the top of a section of hair. Keep the ironing board open for now.
- Step 3: Wrap all the hair around the iron by hand. Wrap your hair away from your face and handle it carefully to avoid burning your fingers.
- Step 4: Hairpin inside the table is about 10 seconds. Your actual time may vary depending on your curling iron and heat settings, so if you need to experiment, go low from the start.
You’ll know it’s time to let go of the curls when you can feel the heat pass through the hair wrapped around the curling iron.
- Step 5: Loosen the hair and repeat on the next section. Removing and clamping the iron as you loosen will help, but be careful not to touch the iron during this process.
2.2. With Flat Iron
Curling your hair with a straightener can create full, bouncy curls that don’t look like curls. Follow along to learn how to get the beautiful curls you’ve always wanted with flat iron.
- Step 1: Divide your hair into sections
Start by collecting your top hair. Start with your thumb where the top of your ear touches your head. Then, straighten your thumbs back to gather all the hair above and secure it with an elastic band.
- Step 2: Start curling your hair
Starting on one side of the head, gather sections of hair about 1-2 inches across. With the straightener facing down, turn away from your face while curling your hair in a fluid motion. Release the curl when you reach the end of the hair. You can use your hands to twist the curls while the hair is loose to add more lock to the curl shape.
- Step 3: Work your way around your head
Continue curling in this way until you reach the nape of your neck and one side is curled. Then, move to the opposite side and curl in the same way, but in the opposite direction: with the flat iron facing down and twisting away from your face.
- Step 4: Create a new section
Loosen your hair with an elastic band and cut a new section of hair from your temples straight to the back of your head. Secure this new, smaller section with a lanyard. The section of hair you have let go will give you another layer of straight hair to curl.
- Step 5: Curl the new part
Repeat steps 2 and 3 for the new section of hair, combing both sides from front to back and twisting the curls away from your face.
- Step 6: Prepare the top part
This is one of the important parts of curling with a straightener: the top! The top part is the hardest part to do, as you don’t want to over-curl. To curl this section of hair, start by removing the hair tie and letting the top section of hair down. Next, make sure your hair is parted the way you want it to be before you start curling.
- Step 7: Bend the top sections forward
When curling the top section of hair, you want to make the curls lighter (in other words, less frizzy.) Two techniques to do this are to take slightly larger sections of hair to curl at the same time, and twist the table. Flatten a little less than you did on the bottom sections. Remember, more spins of the flat iron = tighter curls, so you want to loosen it up for this top. Start curling at the front and back to the side, using the same technique as before, but slightly modified for softer curls. Leave the hair behind for the next step.
- Step 8: Bend the upper back
When you get to the back of your head, pull sections of hair to curl straight to the side. This time, curl your hair in an upward motion. You can do this by holding the flat iron at the same angle to the floor, clipping your hair, and then turning the flat iron away from your head and upwards.
- Step 9: Gently comb your curls
With a wide tooth comb, gently comb through your curls. This softens the curls and gives you a more natural look.
- Step 10: Use a small amount of styling spray to hold your curls and give them a wave effect.
3. How To Curl Your Hair Without Heat?
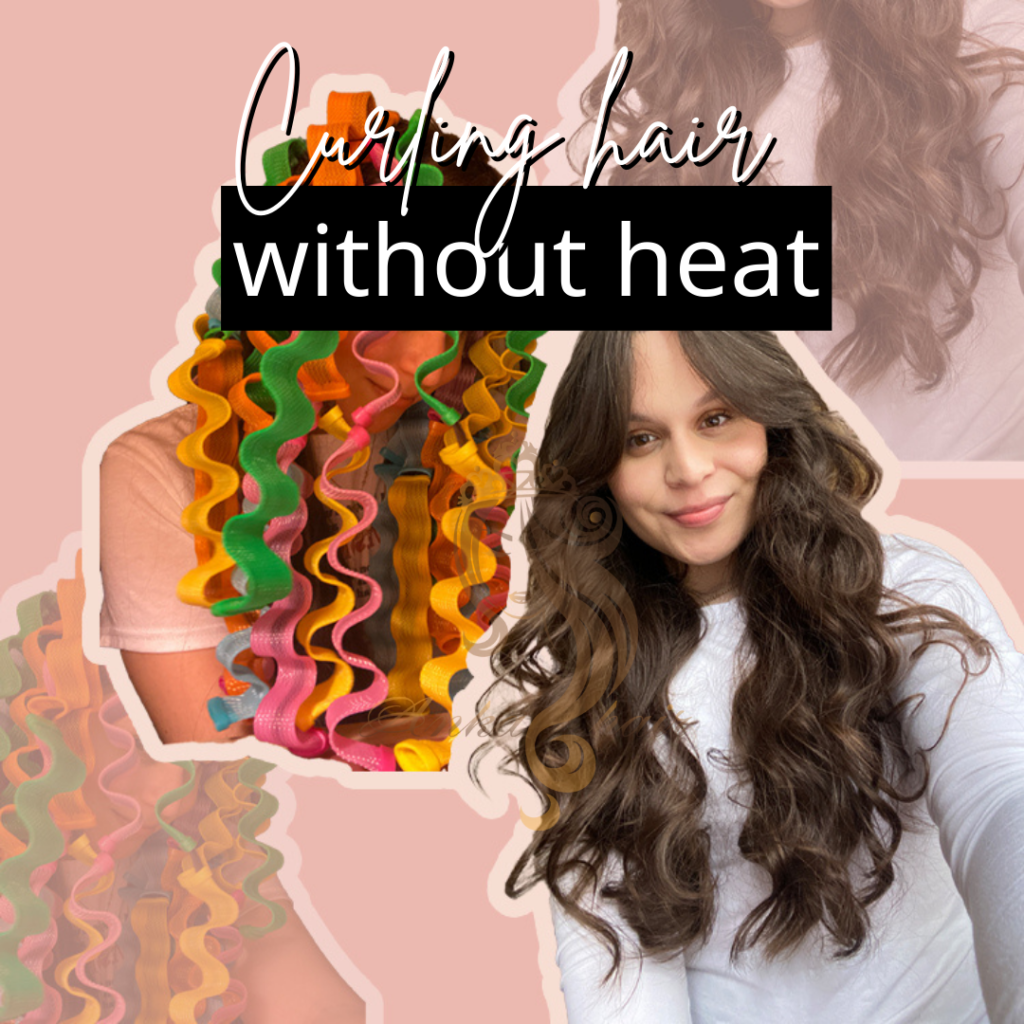
Try one of these heat-free curling techniques to impress everyone with your healthy, curly hair.
- Method 1: Overnight braids
This is one of the easiest ways to get loose curls. Before going to bed, take a shower and let your hair dry most of the time. Then tie the braid loosely. When you wake up, you can pull the hair out of the braid, then use a wide-toothed comb or comb to comb through to separate the curls. Just remember to braid as close to the bottom as possible so you don’t have a lot of frizz-free hair.
- Method 2: Hair roller
Have you seen hair rollers before? These rollers were the name of the game when it came to curly hair before the invention of the hair dryer, and they are still useful today. Take a shower, wait until your hair is about 80% dry and then roll each section in the roller. Wrap your hair in a sheet or scarf to make sure it doesn’t stick together, then go to bed. In the morning, remove all the curls and comb them with your fingers to separate them.
- Method 3: Headband
A typical headband makes it easy to curl your hair overnight. This method produces neither tight rolls nor loose waves. Just take an elastic headband and wear it as usual. Take the curls and loop through the headband as many times as you like depending on the length of your hair. Take off the headband in the morning, then run your fingers through your hair to separate the curls.
- Method 4: Hair halo t-shirt
This technique is virtually identical to the headband technique, except instead of creating soft waves, it often results in bouncy, ring-like curls. Take a t-shirt and twist it yourself until it forms a rope. Tie the ends of the “rope” together with a hair tie. Put it on your head. Pull a portion of hair up and wrap it around the halo starting at the front of the head. Once it’s all wrapped up, wait until it dries and remove the halo.To separate the curls without flattening them, use your fingertips.
- Method 5: Twisted
Toilet paper, a pipe cleaner, baby wipes, or even makeup wipes can be used for the twists. This works best with shorter and thinner hair because otherwise you can quickly get overwhelmed by the workload. Just take a small section of hair, then roll it up with the twisting material starting from the bottom. When you reach the height where you want to start curling, tie the twist back. Repeat on your entire hair. Let dry naturally or dry with a blow dryer on no heat setting. Run your fingers through the curls to untwist all the twists. This is an excellent way to create curls of any size, from extremely tight to much more bouncy.
- Method 6: French braids
An excellent approach to fully curl your hair is with French braids. A French braid can curl your hair up near to your scalp, unlike a standard braid that simply curls it from the nape of the neck down. For best results, make sure you do two French braids, one on each side, or you may end up with an uneven curl that runs just along the midline of your scalp.
For those of you having trouble learning how to curl your hair at home like a professional beautician, here’s a thorough guide. I hope you can design the hairstyle you want.